Sunday, November 14, 2010

Passion!


Lovely, isn't it?

Ok, so you're saying, "Two white doors. What's the big deal?"

This. This is the big deal.


Our second bedroom, which we use as our office (plus guitar storage, cat accommodations, and occasional guest room), was apparently previously a teenager's bedroom. Or possibly a schizophrenic's. I picture a goth princess. When we first moved in, the walls were this awful dull coral color, but around the edge of the ceiling there was a strip of old paint where the last owners had failed to grasp how painters' tape works. So, before yucky dull coral, the walls had been bright vibrant red... and the ceiling had been black. On the back of these two doors (hall on the left, closet on the right), you could see distinct hints of this angsty expression beneath a hastily applied thin coat of white. You could clearly read the word "PASSION" in raised pink letters.

After ignoring it for way too long, I finally got to work with the sander. A couple of hours and two very numb hands later, a blanket of dust covered me and everything in the room, and the full glory of the artistry was revealed.


I was fifteen once, and I kind of get it; besides, I painted a few whole-room murals that I know were a much bigger pain to undo than this pair of doors. So I have a hard time being upset with the artist. Although really: shoe prints? This person dipped her shoes - Vans, specifically - in paint and then planted them on the doors. Multiple times. In different colors. (The vine is kind of nice, though.)

The shoddy job in covering it up - that part annoys me. I would much rather they'd just left it as is, and I would have a lot less white dust everywhere.

It took 4 coats of primer and two coats of paint, but the "passion" has been erased, now preserved only in photos.

Saturday, November 13, 2010

Bookcase

Admittedly it's been a while since we updated the house blog. Don't think, though, that nothing has been accomplished since May. Actually we've been going full speed, especially the last couple of months. We are, in fact, rapidly approaching the end of our stay in our little cottage by the sea. That means right now we're working ourselves ragged trying to get everything finished enough to put the house up for sale. Of course, it will never feel truly finished, even if we get everything on the list complete. Even if we were going to be here for years. That's just the way it goes, I guess.

Anyway, I thought I might write a couple of posts to show some of the projects we've knocked out in the last couple of months. For starters: the built-in hallway bookcase.

When we moved in, the hallway ended in a door that opened to the kitchen. On the kitchen side, it was blocked by a crappy particle board shelving unit (since you can just walk around, with a scant few extra steps, from the kitchen through the living room to the hallway). When we remodeled the kitchen, they removed the door, put up a new bit of wall, and hung cabinets on the kitchen side. A tremendous improvement in the kitchen; not so much in the hallway, which now ended in wasted space.


But - no more!


Brendon gets all of the credit for the masterful carpentry. We found some nifty shelving strips (ok, I have no idea what to call them) at Home Depot that allow the shelves to be adjustable heights. Both of us worked on staining it. I will never again buy the gel-type stain with the protective coating mixed right in. The stuff is AWFUL to work with, and it isn't the prettiest staining job I've ever been a part of. It's a somewhat dark hallway, though, and we've declared it "good enough." The color is pretty close to the kitchen cabinet color, so it kind of ties the house together. And now our fiction/scifi books, Brendon's Navy and car books, all my library science books, and a whole bunch of lovely IKEA magazine boxes have a space-efficient place to call home, next door to the linen closet.


Sunday, May 16, 2010

No longer a cardboard box


The progress continues. . . After a bit of a respite, it seems we have gotten back into the groove of getting stuff accomplished on the house.

One of the things that we have been working on slowly for the last year has been to add some curb appeal. When we fist moved in, it was little more than a brown box, sitting atop brown land, on a street filled with brown houses. The new front yard took care of the bottom layer. We had wanted to paint it since we first moved in, but only just now pulled the trigger to do it.


The tan never really did it for us, and we also really wanted to get rid of the black trim (really who does that?). We were looking to paint it a bluish gray, and after looking through a large book of paint chips, we thought we had picked that out. We matched this with a white that had a touch of gray in it, so it hopefully wouldn't be quite as jarring as the bright white typically used for trim.

Between a much needed pressure washing, the base coat and the trim, it took John DeFranco from A&S Painting the better part of three days to complete the painting of the house and garage. And one of the first things we realized, is that the color we picked out wasn't so much bluish gray as it was grayish blue. Fairly bright blue, in fact. So bright that with just the blue and the white trim together, it looked like a tribute to the University of North Carolina, Cara's Alma Mater by the way (but not nearly as bad as the house in a friend's neighborhood in Jacksonville that was painted in University of Florida colors).


To set the new paint off, we also got something that we have never had on the house, SHUTTERS!!! Should I be that excited about it, probably not, but it really ties it all together. We ordered some vinyl shutters that are already colored, and thus didn't require any paint, from Larson Shutter Company. These came in the mail, and with the use of my trusty Milwaukee drill, went up in just a few minutes.


We did have to do some painting ourselves though. We opted to do the doors ourselves. And by ourselves, I mean Cara did a fantastic job painting the doors. You may not have gathered this yet, but I hate painting. But we did the doors to match the shutters in a wine red color, actually called Chianti by Behr. We still need to finish some touch-ups on the doors, but it done for the most part. And the house looks fantastic if I do say so myself. Next step is to put up a white picket fence, and finish off our little cottage by the sea.


Monday, May 10, 2010

Backsplash: One Year Later

Readers may recall these photos of the kitchen after our big remodel project about a year ago.


It has admittedly taken quite some time to get any of those loose ends wrapped up - but we finally have a backsplash.

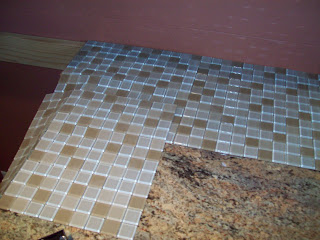
I had ordered 25 square feet of 12" x 12" sheets of 1" square mosaic glass tile from Anchor Bay Tile, and I had instructions from This Old House in hand. We'd gone to the Home Depot and picked up everything else: mortar, grout, caulk, tools. Brendon left town on Friday to go do fun Brendon-y things, and I stayed home and began the three day install.

Friday I cleared everything off the counters and pulled out the appliances (ok, Brendon helped pull the range out before he left, but we overlooked the fridge and I had to slowly scoot it out on my own). I assessed the walls, which were quite sad after the contractor's patching work last year.

I mixed up the mortar, and laid out the tile sheets.

The mortar proved slightly tricky. This was my first experience with tile or mortar, so I don't know if perhaps I didn't have the consistency quite right, but I had a rough time getting it to stick to the wall in places and it made a humongous mess. By the end of the night, though, I had all of the sheets up.

With the small tiles, I was hoping that I would be able to fudge things enough to make the tiles fit and cover without having to make any cuts. This did not pan out as hoped. Saturday morning, I drove back to home depot and rented a wet saw. I, who have never before used a power saw, cut 30-some 1" tiles in half in my backyard. (Really, I cut a lot more than that, but I wound up with just 30-some good cuts, that were even-ish halves and not crazy wonky shapes. As I still had all my fingers and both eyes, I considered it a successful endeavor.) I stuck the halves one-by-one around the power outlets and along the bottom of the window.

The rest of Saturday, I cleaned up the mortar drippings and let the mortar finish curing.

Sunday, I grouted everything. Again there was a learning curve, particularly where it came to taking off the excess grout from the tile face. At first I sponged too much and washed the grout out of the spaces. Then I left too much of a haze and had to sand off more than I would have liked with a sanding sponge. The job was pretty forgiving, though, and it came out well. A bit of caulk around the perimeter, and the tiling was finished.


I touched up some spots with the terra cotta paint, both spots that had needed it before the backsplash project and spots that I made with wayward mortar/grout/caulk. Then I cleaned all the grit and yuck off the counters and floors, and scooted the appliances back into place.

Ta Da!